How And When To Transplant Your Seedlings
Published :
Jul 5, 2018
Categories :
Cannabis cultivation

Why do cannabis growers start seedlings in small pots just to transplant them to larger ones later? Wouldn’t it be less troublesome and more convenient to start your plants in their final pots? Find out about the benefits of transplanting seedlings, and learn how and when to transplant them.
Less experienced cannabis growers may think that transplanting plants from a smaller container to a bigger one isn’t really necessary. They may start their seedlings in their final pot and skip the “potting-up” later on, finding this easier and more convenient. Although you can get away with this when growing autoflowering strains, you should always consider transplanting your photoperiod seedlings.
WHY YOU SHOULD TRANSPLANT YOUR SEEDLING
Bypassing the transplant process means that the roots of your seedling will be held in a large amount of soil. Since your seedlings are still tiny and their root system isn’t developed, they can only take in small quantities of water as they grow. As a result, moisture will be sitting in the over-sized container, which can result in root rot, causing nutrient deficiencies and all sorts of growing troubles.
But when you start seedlings in smaller starter containers, such as in small cups, Jiffy pots, rockwool cubes, or similar, you can avoid these problems.
WHEN IS THE RIGHT TIME TO TRANSPLANT YOUR SEEDLING?
There are several ways to determine the right time to transplant your seedlings:
• Number Of Leaves
Growers normally transplant their seedlings into a bigger pot once the plants have reached a certain size. When your seedling has developed 4–5 sets of “real” leaves, this is usually the right time to transplant. At this point, the roots of most strains will have outgrown their starter cup. Obviously, this is not an exact science, and some strains may be ready somewhat earlier or later—but it should do as a rough indication.
• When Your Seedling Becomes Root-Bound
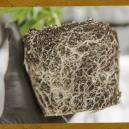
Your seedling becoming root-bound means that it has truly outgrown its container. The roots have filled out the pot and would like nothing more than to expand further, but there is no space left for them to grow. They are “bound” in the confines of the pot.
One sign that your plant has become root-bound (and that it’s now time to pot-up) is when you see roots coming out of the holes in the bottom of the starter pot. This method is also not 100% exact, but it serves well to let you know that it is time for a larger container.
• At The End Of The Vegetative Growing Phase
Some growers don’t look so much at the signs themselves, but instead adhere to a schedule. These growers transplant their seedlings in the final two weeks of vegetative growth, right before the plants start pre-flowering. After repotting the plant, it will rapidly expand its roots and grow significantly bigger within a short time.
HOW TO TRANSPLANT YOUR SEEDLING
Although it’s possible for transplanting to result in “transplant shock” (which delays growth), when done carefully, transplanting can be a near-seamless process. The worst thing that can happen is that you damage the fragile roots as you are moving your seedling. But if you are cautious and handle your seedling with care, transplanting shouldn't overstress or harm your growing baby.
If you are transplanting from small cups, lay the plant on a solid surface and gently squeeze the sides of the cup to loosen up the dirt. This should make it easier to slide out. Then, with one hand flat, cover the opening of the starter pot, with the plant sticking straight out between your fingers. Now, flip the pot over. With gentle movements and by applying slight pressure on the outside of the pot, get the seedling with its roots to slide out. Avoid pulling the seedling.
The receiving pot should be adequately prepared. It helps to get the soil ready and create a hole of the right size to receive the seedling. Don’t delay once you remove the seedling from the starter pot. Move it to its new home quickly and fill up any remaining empty spaces in the new pot with soil. You may want to slightly flatten the new soil to stabilise the transplanted seedling. Be careful and only slightly push down without using much force. After the transplant, amply water the plant in its new container.

WHAT TO CONSIDER WHEN TRANSPLANTING SEEDLINGS
• Choose the right pot size. Without overcomplicating things, an easy rule is to choose a new container that gives your seedling as least twice the space of its original container. But you shouldn’t go too much larger, especially if you plan to put-up again later.
• Make sure the receiving pot has been filled with your grow medium and that there is enough space to safely transplant. Have the new pot ready as you remove your seedling from its old home.
• Be very careful that you don’t damage the roots when transplanting. In particular, make sure roots are not stuck inside so they don’t rip as they come out. In difficult cases where the roots are entangled, you may find yourself unable to easily remove the starter pot. Use a sterilised knife and carefully cut the roots that are sticking out. As a last resort, you can carefully cut open the starter cup.
• If your seedling is in a Jiffy pot, you may want to gently remove the netting before transplanting. Not always will these nets really dissolve as claimed. There have been cases where roots were stuck in these nets for the entire duration of a grow, severely inhibiting healthy growth. If you can’t easily remove the net when transplanting, use a sharp utility knife and carefully cut vertical slits into the netting, without cutting any roots.
• Avoid transplanting under intense light. If possible, transplant at night. This can help reduce the risk of transplant shock.
• Always water thoroughly after transplanting.
• Although not necessary, right after a transplant can be a good time to provide your seedling with a root stimulant. You can find special additives available on the market that are designed to ease the stress from transplanting.
Tip: Seedlings are particularly sensitive and need special care. In the Zambeza growing section, you can find everything to keep your plants happy from the moment you plant your seed, all the way to harvest.
To get your seedlings off to a good start, we recommend the Zambeza Starter Pack, which is designed to help your plant thrive throughout its entire lifespan.


